
2023 EDIT: If you liked this post, feel free to share it on Facebook, Twitter, Linkedin !
Recently I was integrating native Android components into React Native. It quite surprised me, that there are still some undocumented tricks and tips especially for adding more complex views or fragments in the Android ecosystem. In this post, I will try to write them down together. See the detailed content below:
Content
- React Native Package - What It Is And How To Create One
- Native Module in React Native - Integration Example
- Intro to Native Android Components (Views) And ViewManager
- Creating native view component (and from XML files)
- Rendering native view component in React Native
4. Native Android Components (Fragments) in React Native - Integration Example
- Committing fragments to the views
- Rendering fragment's placeholder
- Finding the ID of the view in React Native
- Sending the command to commit fragment from the React Native to a native component
- Receiving commands in Android
- Adding measure layout method
5. Receiving Data In JS From Native Android UI Component
- Event types
- Registering events for Native component
- Sending received data from component to JS
- Handling data from android in React Native
6. Summary
So, Where to start?
As some may ask what’s the difference between Native Module or Native Component, the answer is really simple - Native Modules consist of platform-native code, but with no UI included.
Because there could be some readers, who integrated neither Native Modules nor Native Components to React Native, I will briefly describe the process of integrating custom Native Modules first. If you already know this process, please, skip to the next section.
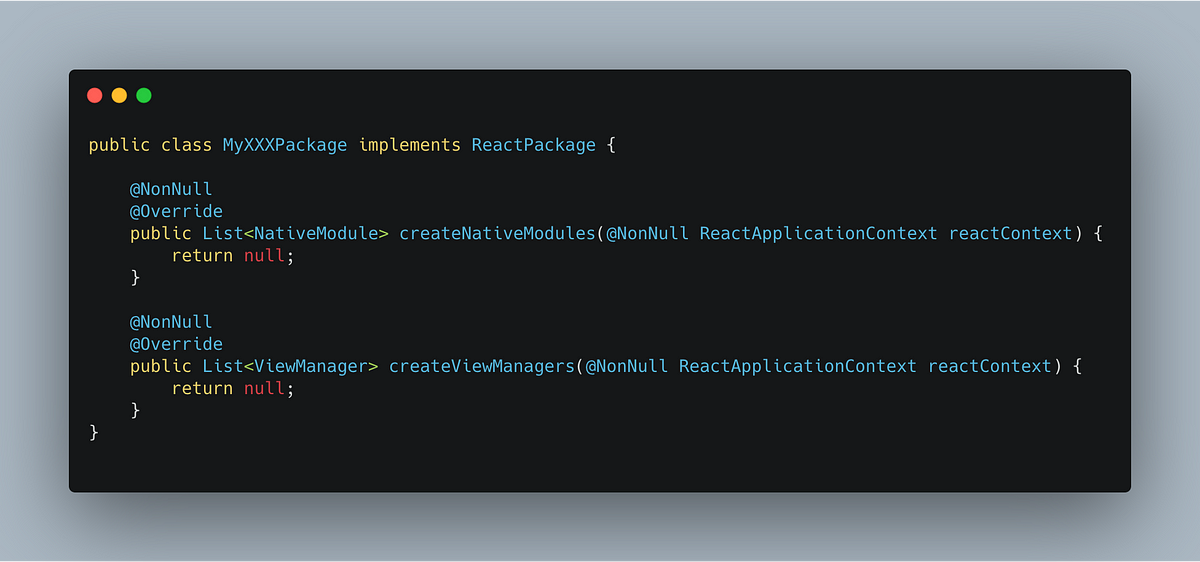
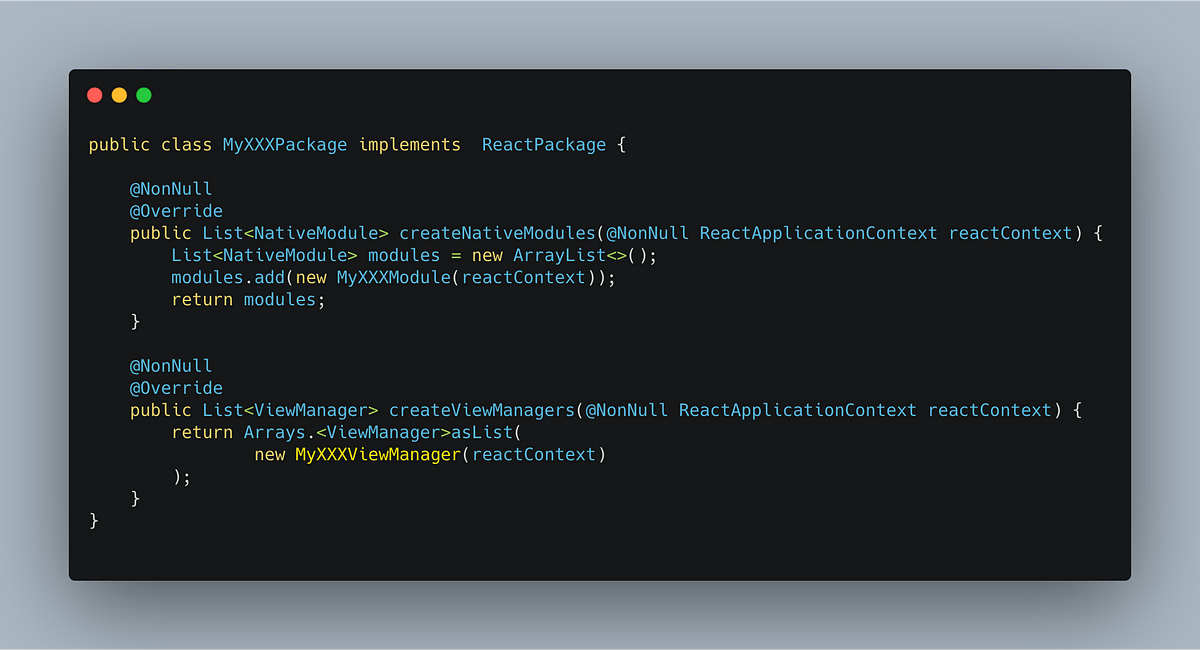
Whether we will integrate Native Module or Native Component, we still need to implement the same class so-called Package class.
React Native Package — creating MyXXXPackage class
The package class logically groups our UI and non-UI application components that are somehow related. The responsibility in the following methods goes like this (screenshots are from Android Studio):
- createViewManagers is responsible for UI components
- createNativeModels is responsible for handling native code (without UI)
Let's create a one. We just need to implement the ReactPackage interface:
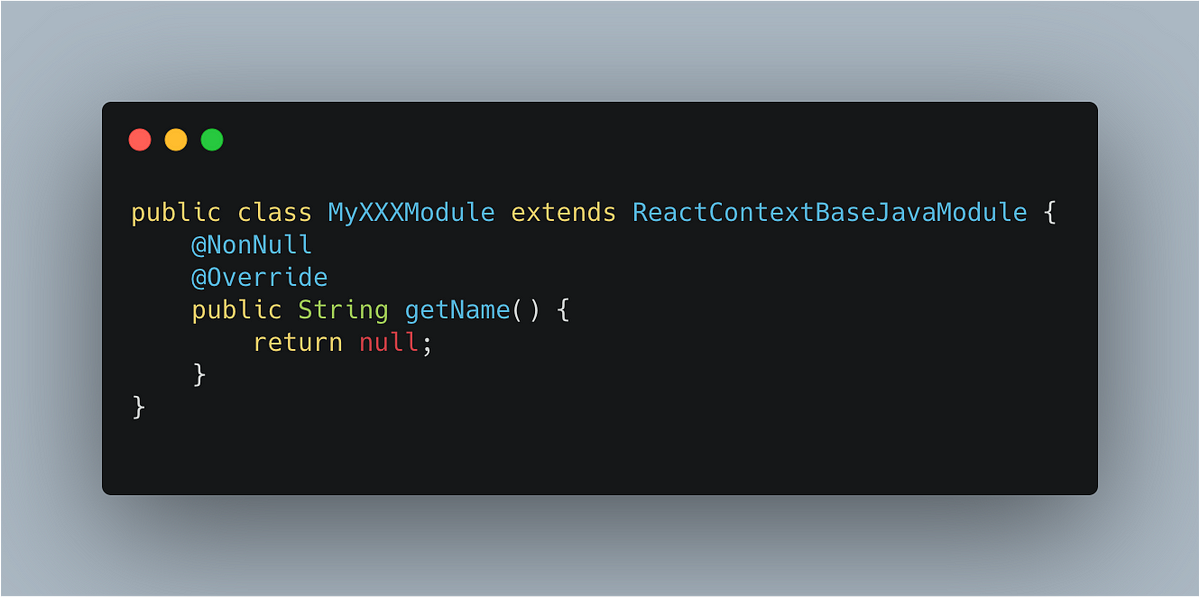
Native Module Integration Example
Then, we need to create a new class that extends ReactContextBaseJavaModule. See the simplest example below (not quite usable, but we could consider it to be Native Module technically):
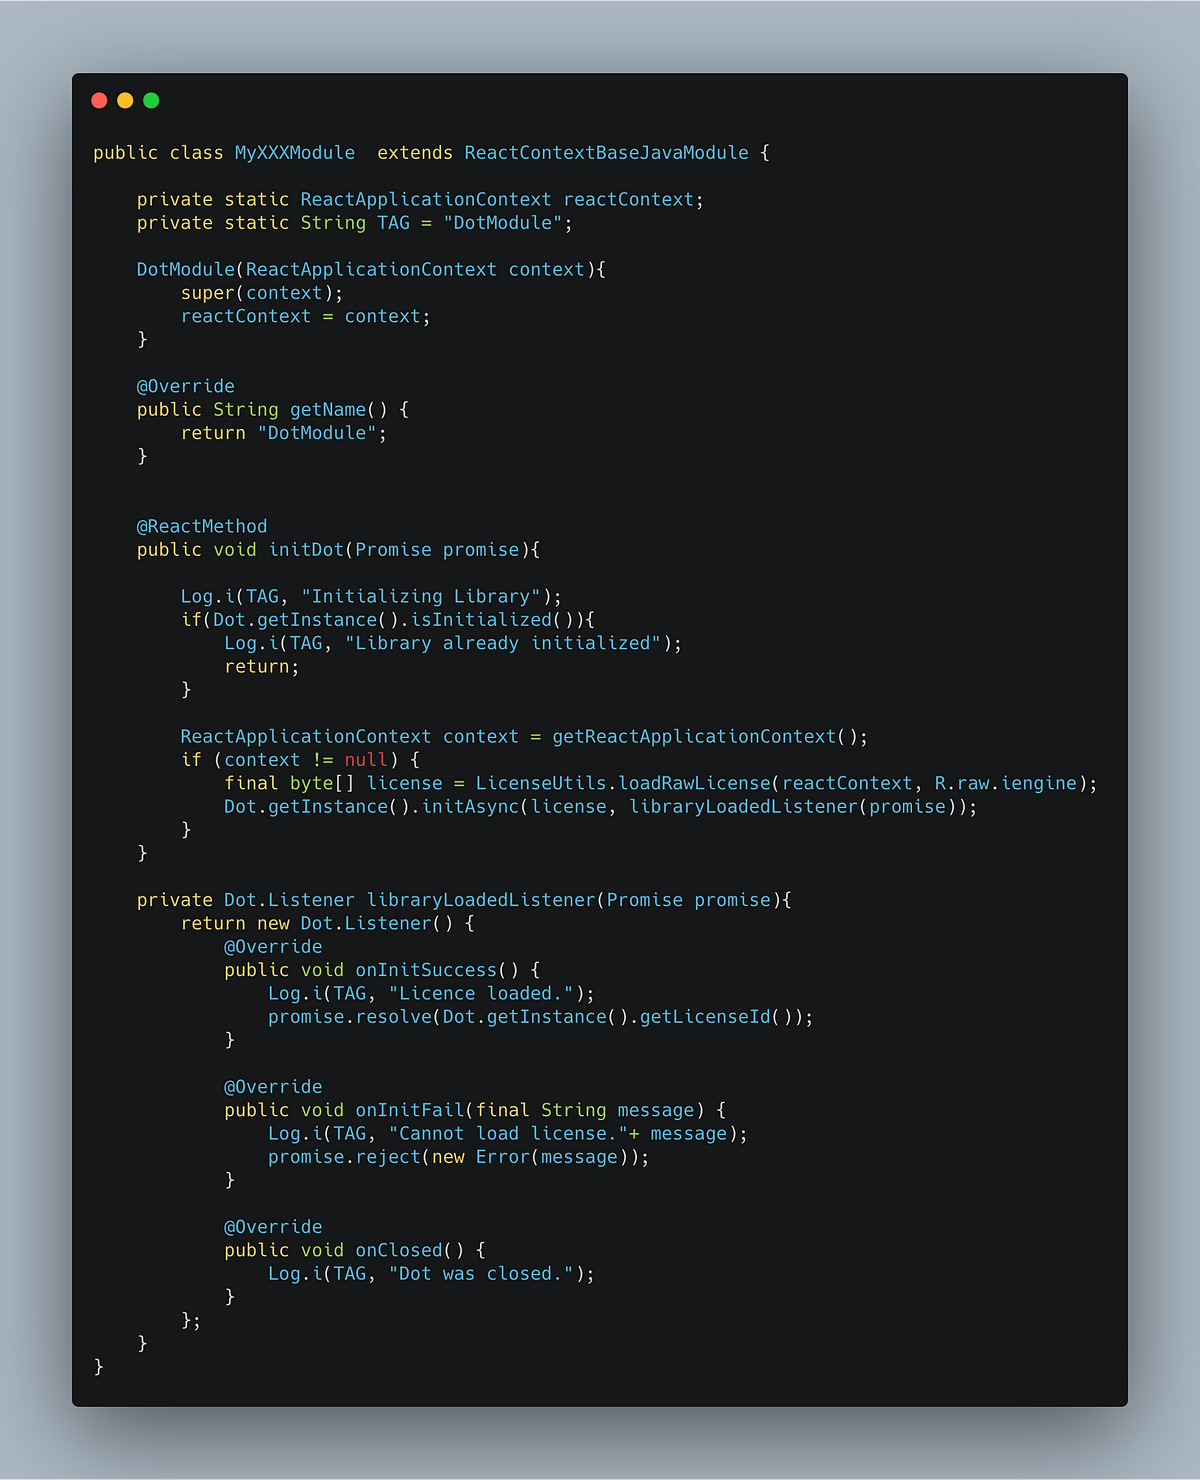
Let's add some functionality to the MyXXXModule:
Notice these things (all of them are very well covered in the official docs):
- We are extending ReactContexBaseJavaModule
- We need to implement the getName method (that’s how our package will be named in JS side)
- We are using ReactMethod annotation to tell RN bridge, which methods it should register and expose on the JS side.
- We have quite enough options on how to send the result back to JS side callbacks, promises or event emitting.
Finally, we register our module class in the package class we have previously created:
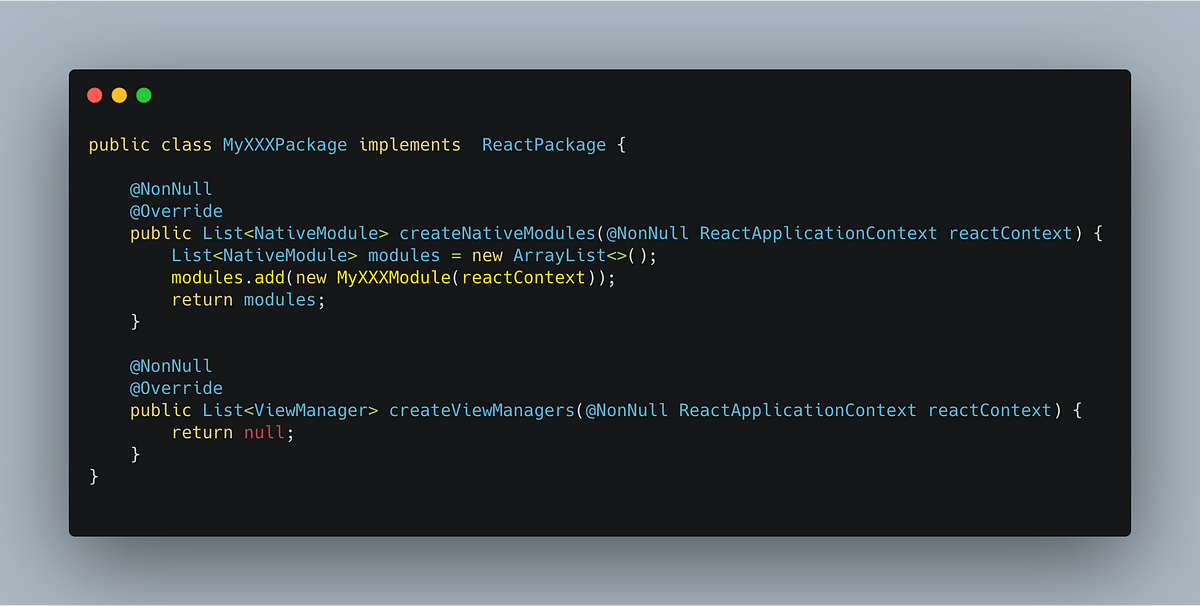
Then we can call our initDot method in JS by calling the piece of code below (the name of the imported component must be the same as in our MyXXXModule's getName method / not as the name of module class):
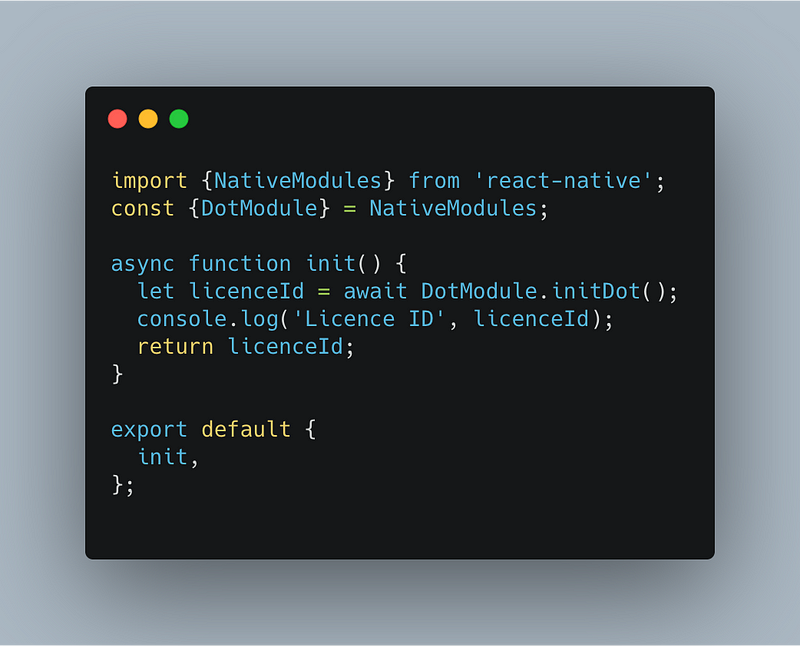
Tip: put console.log({NativeModules}) somewhere into the app start process to see what is loaded.
Native (UI) Components — Native Views
Intro
After we briefly recapitulated how to integrate Native Modules we can continue to implement our first Native Component. However, we will not just present the code and describe it, because there are some in-between-lines that need to be mentioned first.
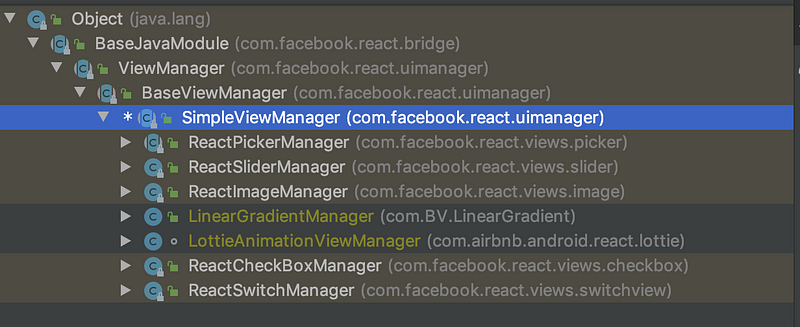
To implement basic UI Components, according to the official React Native Docs (in time of writing this) we should extend the SimpleViewManager class. As you can see in the Hierarchy View, a lot of third-party libraries use SimpleViewManager.(ReactPickerManager, ReactSlider Manager, etc…) If we take a look at the class hierarchy, we would see that it extends BaseViewManager too:
If we analyze SimpleViewManager parent's hierarchy - BaseViewManager class, we would see the following:
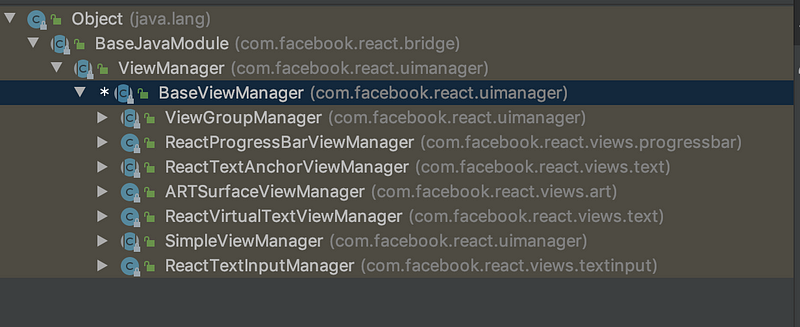
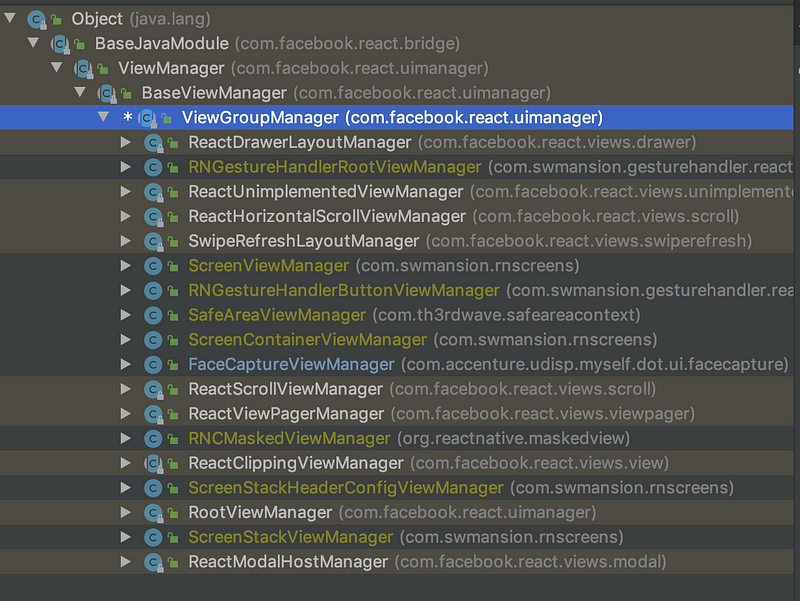
Notice classes that extend BaseViewManager: ReactProgressBarViewManager, ARTSurfaceViewManager, ViewGroupManager, ReactVirtualTextViewManager, SimpleViewManager etc..Wait, ViewGroupManager ?
ViewGroupManager
From what we see we could think that ViewGroupManager could be an alternative to the SimpleViewManager. Let's open it and see what's inside:
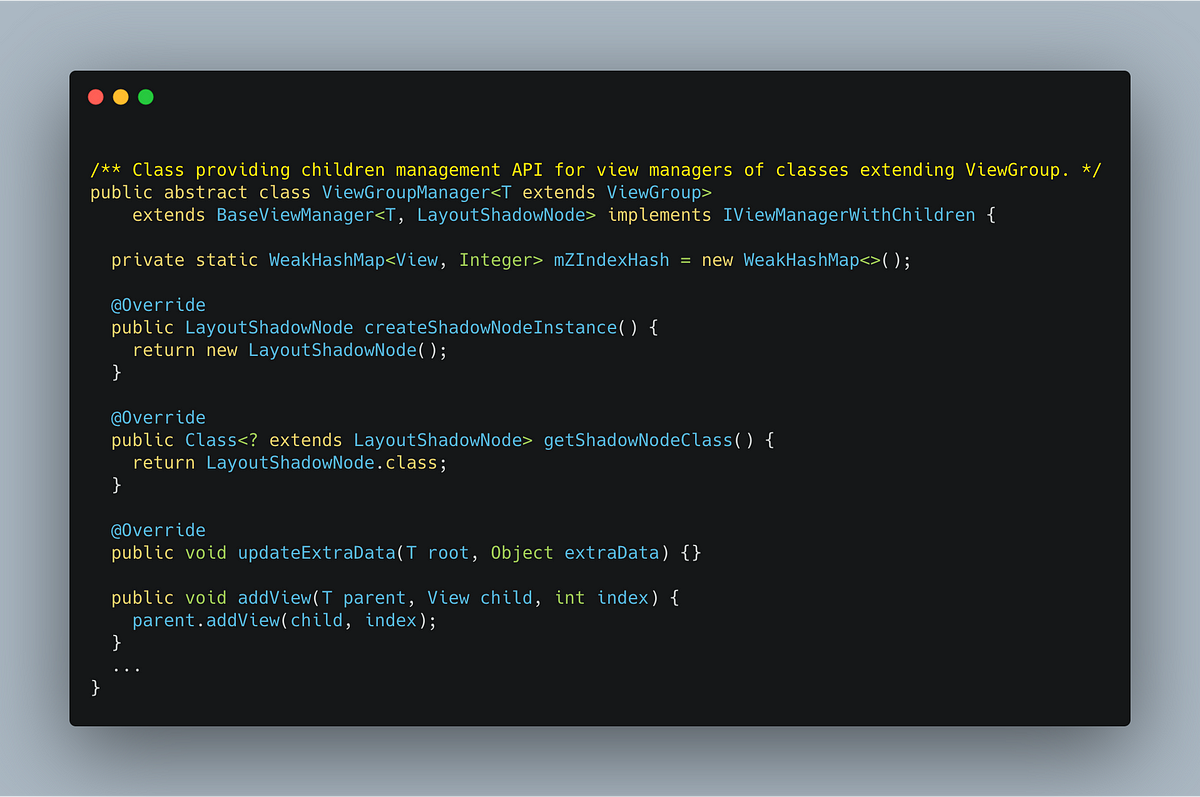
What's important for us, was the comment: Class providing children management. We can guess the ViewGroupManager is useful for complicated layouts (nested views, fragments are added and removed on the fly, etc.). Moreover, it seems to be widely adopted by the developers:
After we briefly described the hierarchy of ViewManagers in the Android implementation of React Native, we can continue to write our first Native Component.
For take-away
Although docs are well maintained, there are still some parts, that could be improved. Do not hesitate to take a look at the code and try to understand it, since everything is on Github and in Android Studio :). For implementing Native Components in React Native for Android you should know about the differences between ViewManager subclasses and when to use which according to your concrete use-case.
Creating Native Component in Android (and from XML files)
We will start by creating our native component class. We will call it MyXXXViewManager and we need to extend either ViewGroupManager (or SimpleViewManager) and then add a reference of it into our Package class.
Let's create new empty MyXXXViewManager :
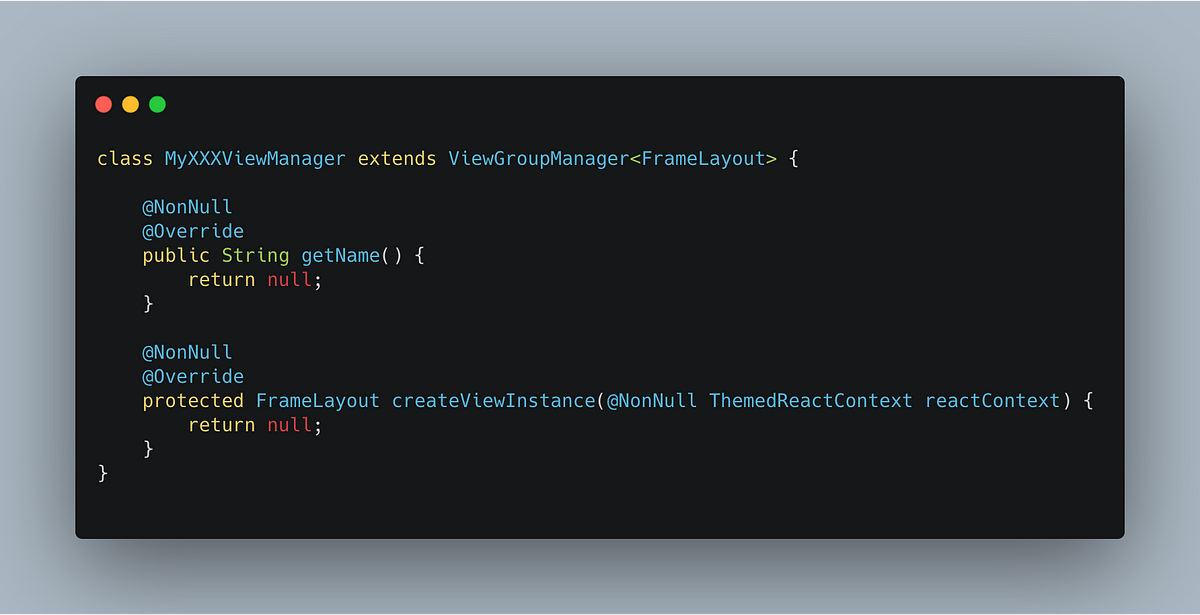
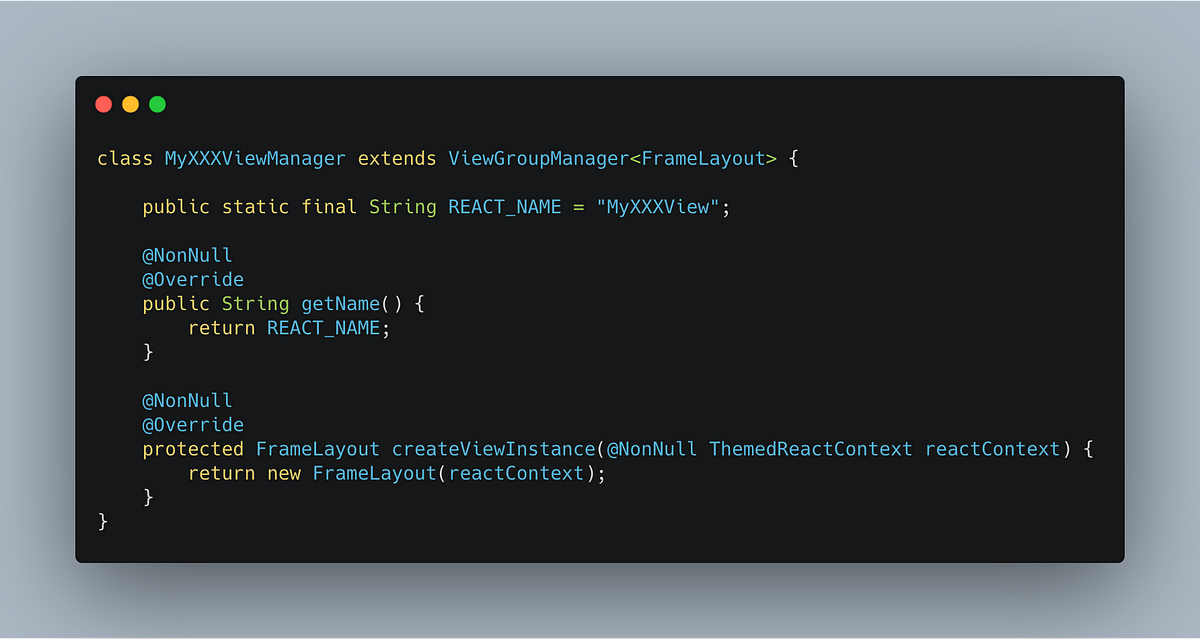
Then, let's add very basic functionality that consists of adding name (with this name we will be importing component in React Native) and implementing the createViewInstance method. In createViewInstance method we will return some kind of Layout (e.g. LinearLayout, ConstraintLayout or FrameLayout as almost all Layout subclasses extend ViewGroup and therefore could be used inside ViewGroupManager):
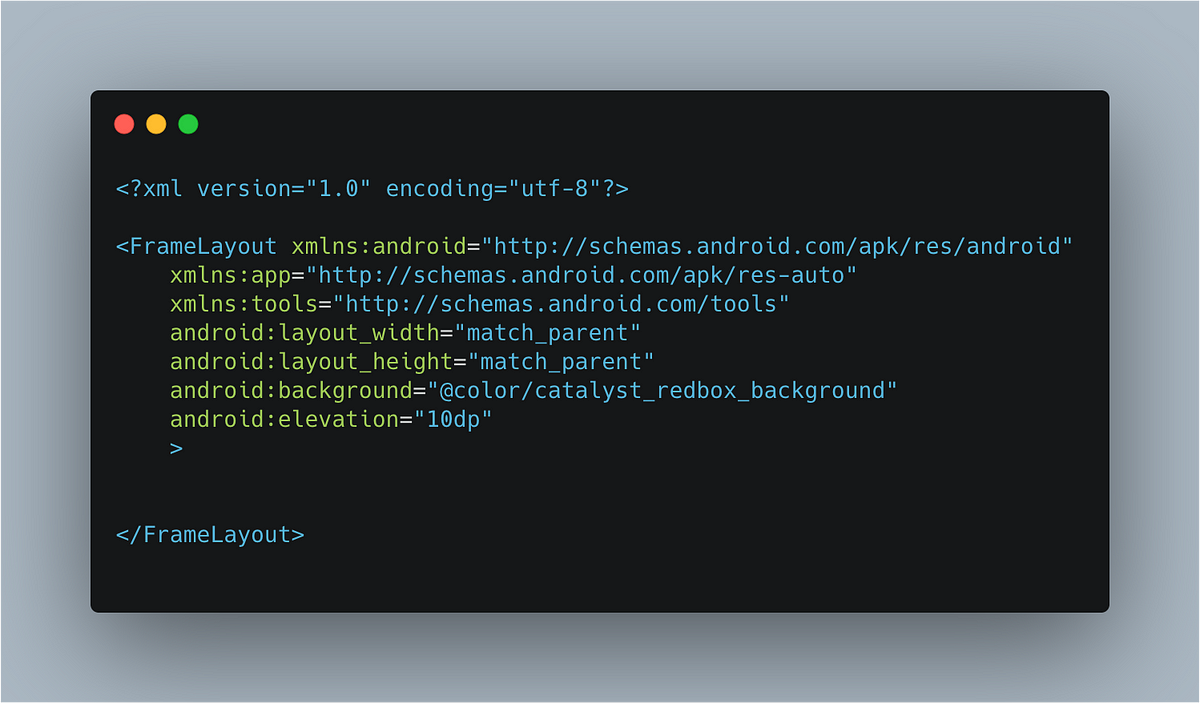
If we would like to inflate our view from the XML layout file located in the layout resource folder, we could do it like this:
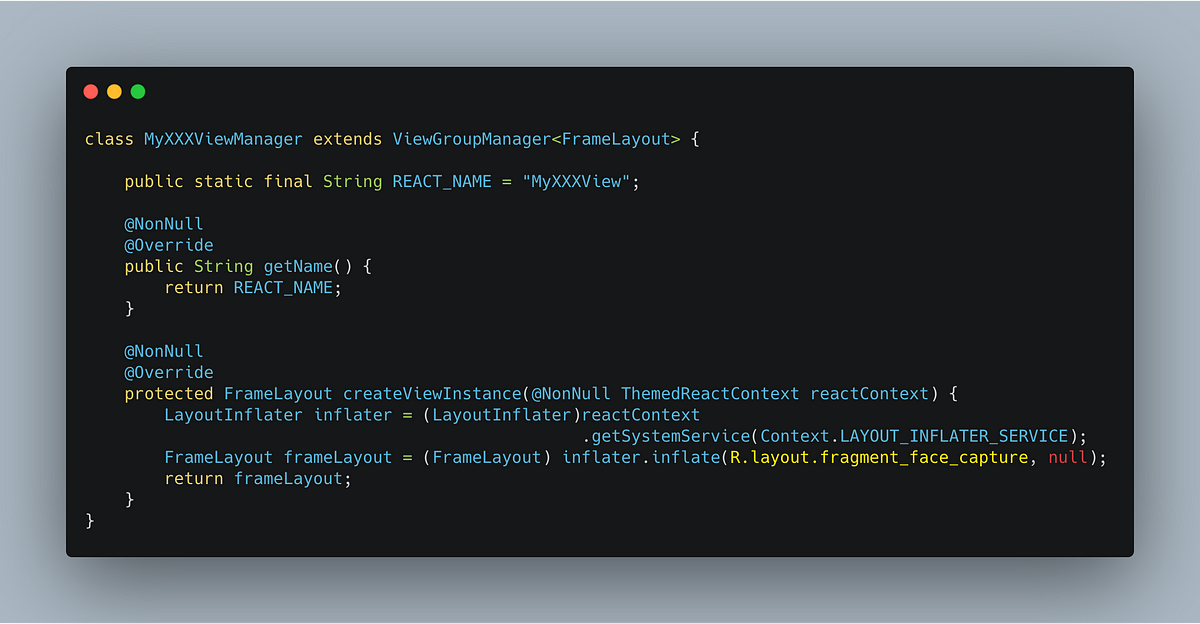
For those not too familiar with the Android Development, string R.layout.fragment_face_capture inside createViewInstance method points to the layout file located in the src/main/res/layout folder (image on the left).
For simplicity, the content of fragment_face_capture.xml could look like the following (just the simple view with the red background):
Then, let's add our MyXXXModule reference to MyXXXPackage class (inside createViewManagers method):
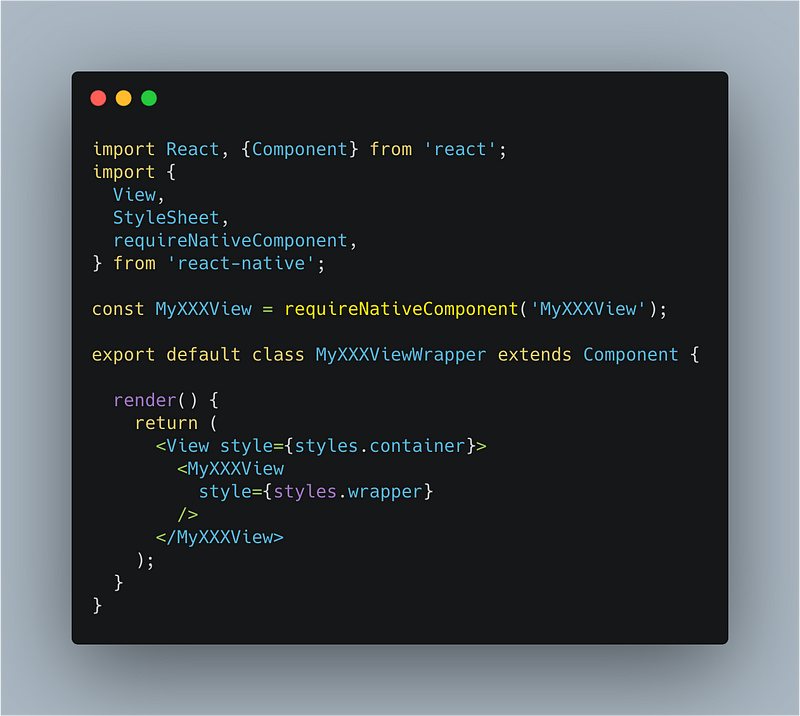
Then, in React Native side, we can access our view by calling requireNativeComponent.
But remember - if your view consists of several separate views that are in a parent-children relationship, React Native will override the styling of the top-level component behind the scenes.
Rendering Native View in React Native
Native (UI) Components — Native Fragments
Intro
To support native Android fragments inside React Native, there are few changes needed to be done.
In general, we are following this simple principle: at first, we render just a placeholder view. When the component is mounted in the JS side (didMount of the corresponding React Native component is called), we then somehow tell the Native Component to add Fragment to the scene.
For those not aware of how fragments work, or what fragments are:
- Fragments are just another part of UI in Android (but with slightly different lifecycle).
- We can add them to Views, or "make them visible for the user" by executing transactional operations and calling commit() method.
- These transactional operations are executed with Fragments Manager.
Fragments types
We could find ourselves struggling with Fragments classes very easily — just because there are two fragments types and also 2 corresponding FragmentManagers responsible for managing them (we can not just use any fragment manager we want):
- android.app.fragment uses FragmentManager
- android.support.fragment or androidx.fragment.app.fragment uses SupportFragmentManager
Implementation — Changes in the MainActivity.java
Some time ago, if we needed support for the android.support.Fragment or androidx.fragment.app.fragment, we needed to modify our MainActivity to extend from FragmentActivity instead of ReactActivity like in the following picture:
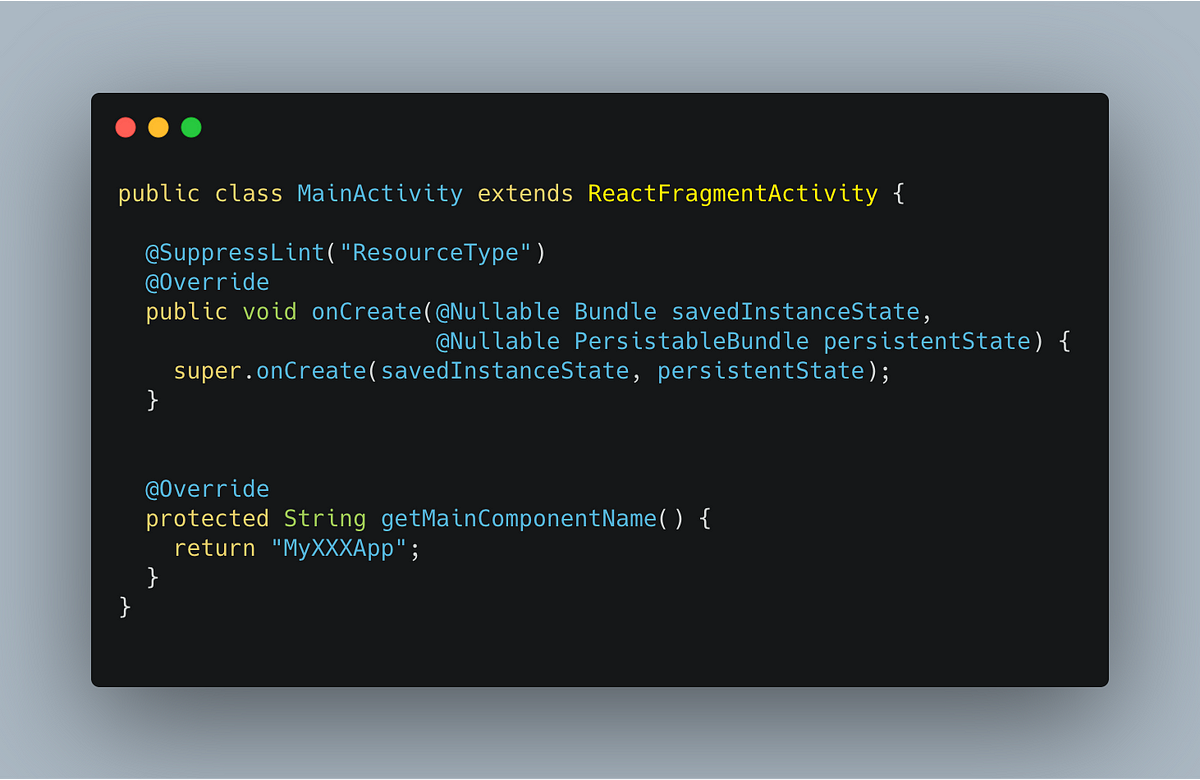
But as during the time of writing this ReactActivity extends AppCompatActivity that extends FragmentActivity, no further action is needed.
Making sure we are extending the FragmentActivity is crucial for adding proper FragmentMaanager that is used for committing fragments to the views later on.
Committing Fragments to the Views
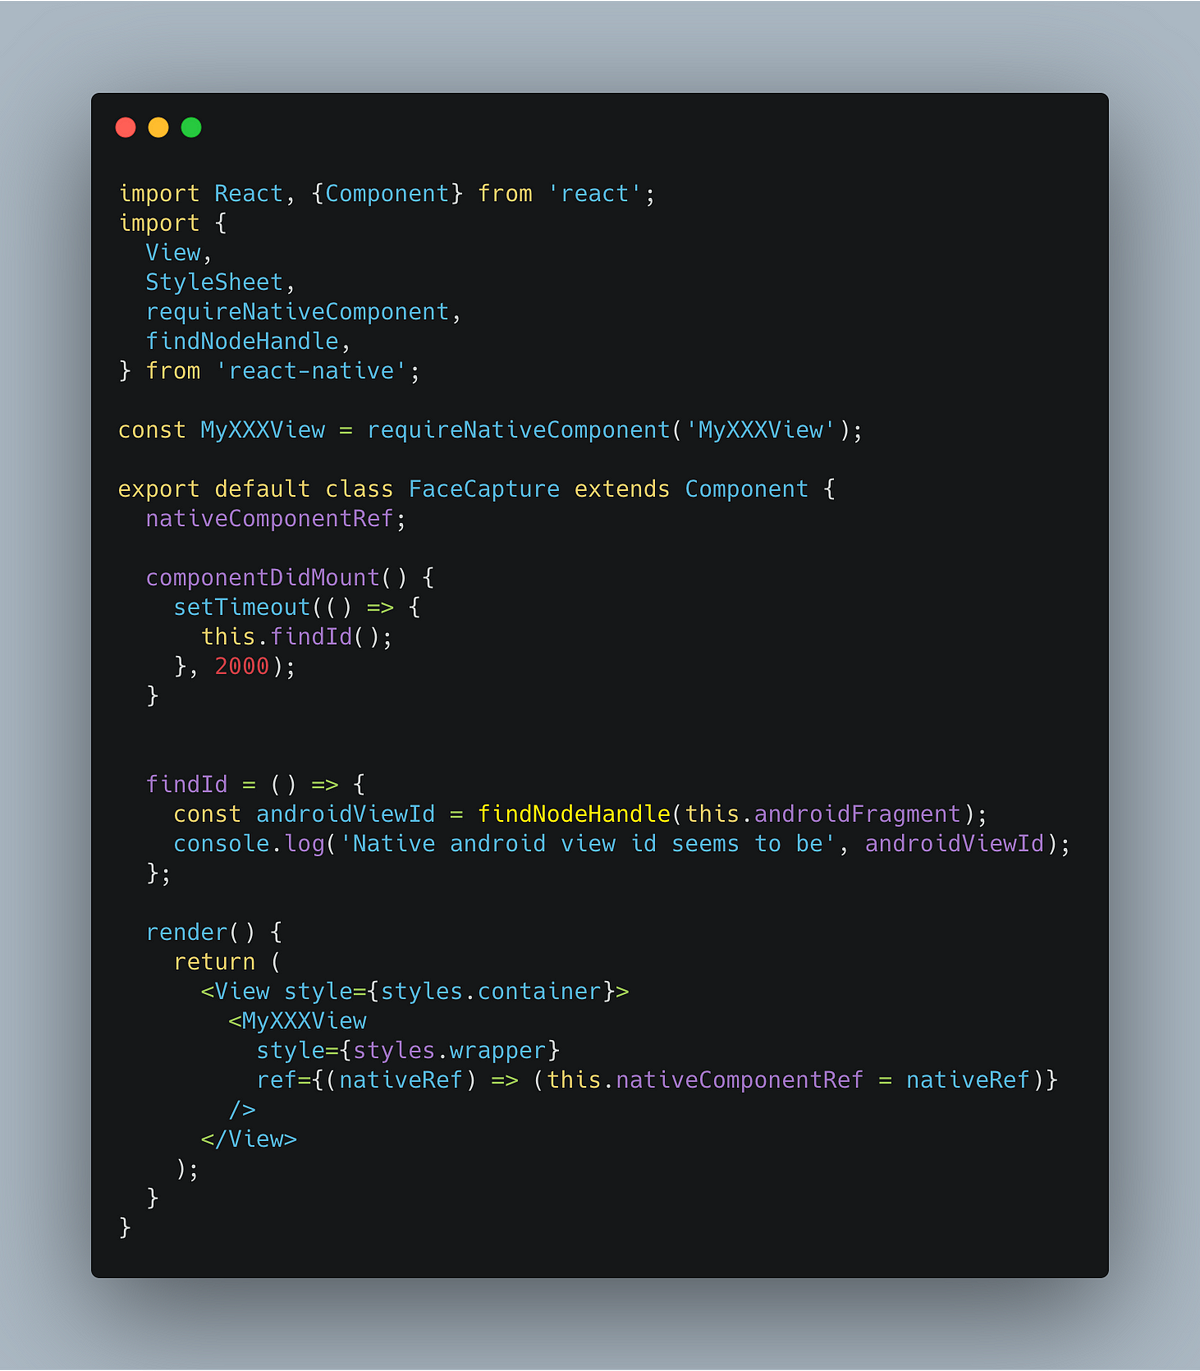
Remember, we are going to display a placeholder and later add a fragment to it. In fact, we are going to render a placeholder, find the id of the view in the React Native, and then we send the instruction to the Android side to execute a transaction for adding the fragment ending with calling commit().
Rendering fragment placeholder
We can start with this (produced by previous steps):

Find the ID of the view in React Native
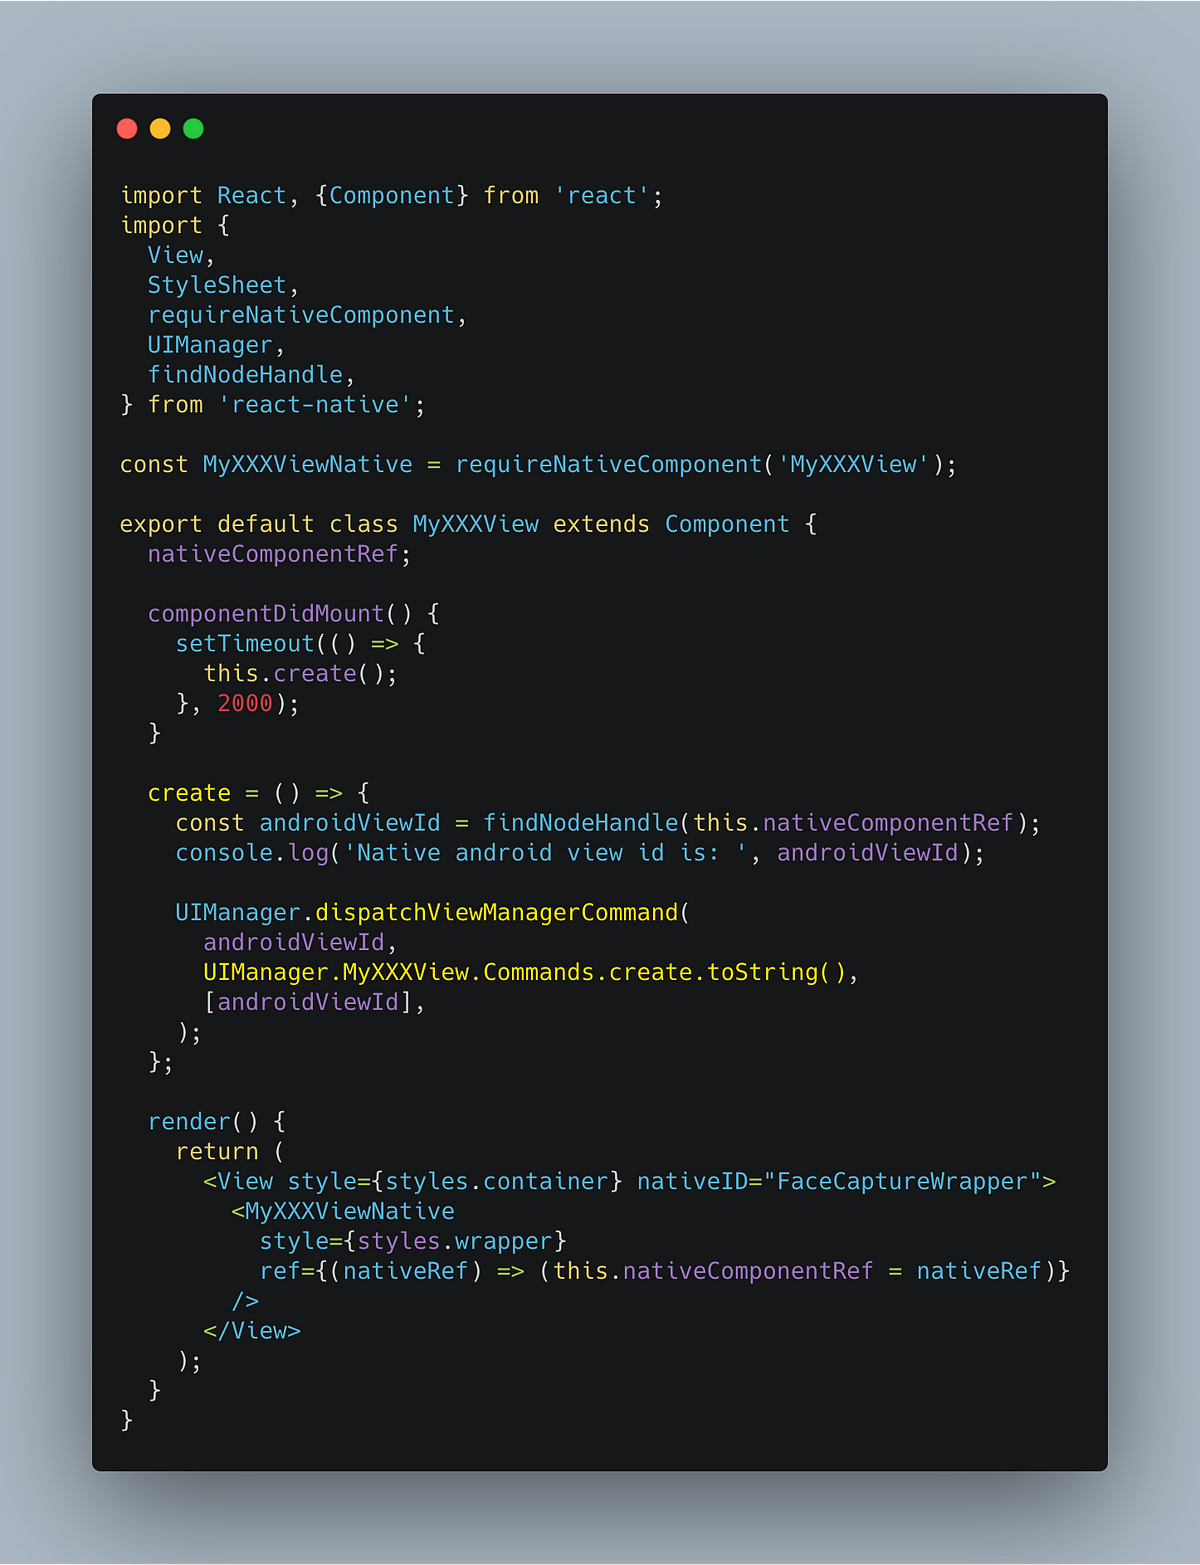
When we already rendering fragment placeholder, then we somehow need to figure out the ID of the view, but remember: view ID's are different on React Native JS side as RN bridge overwrites a lot of things related to the components. We can find the proper view ID by using the findNodeHandle method onReact Native side (as this method accepts React reference as argument) :
Sending the instruction for committing Fragment
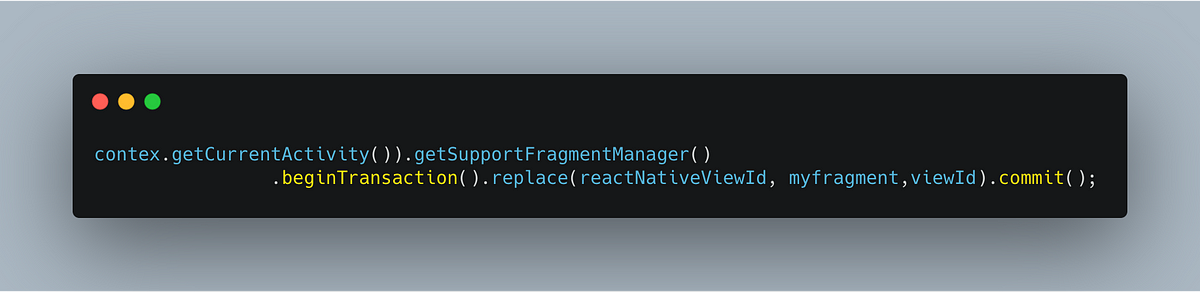
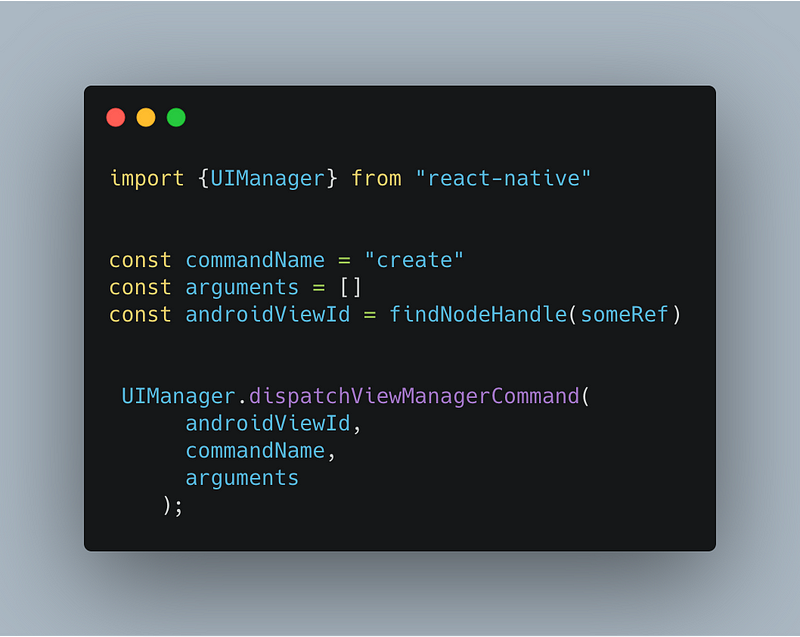
Now, when we are rendering placeholder and we have found the correct view ID, we somehow need to tell the Android to find proper FragmentManager and execute the transactional operation for adding the fragment to our view (to the view, whose ID we have found by using findNodeHandle mentioned the previous step).
We are going to send the so-called "command" to our Native Android Component .
For sending commands to the Android from React Native, we can use UIManager and its dispatchViewCommand method - see the simple example below:
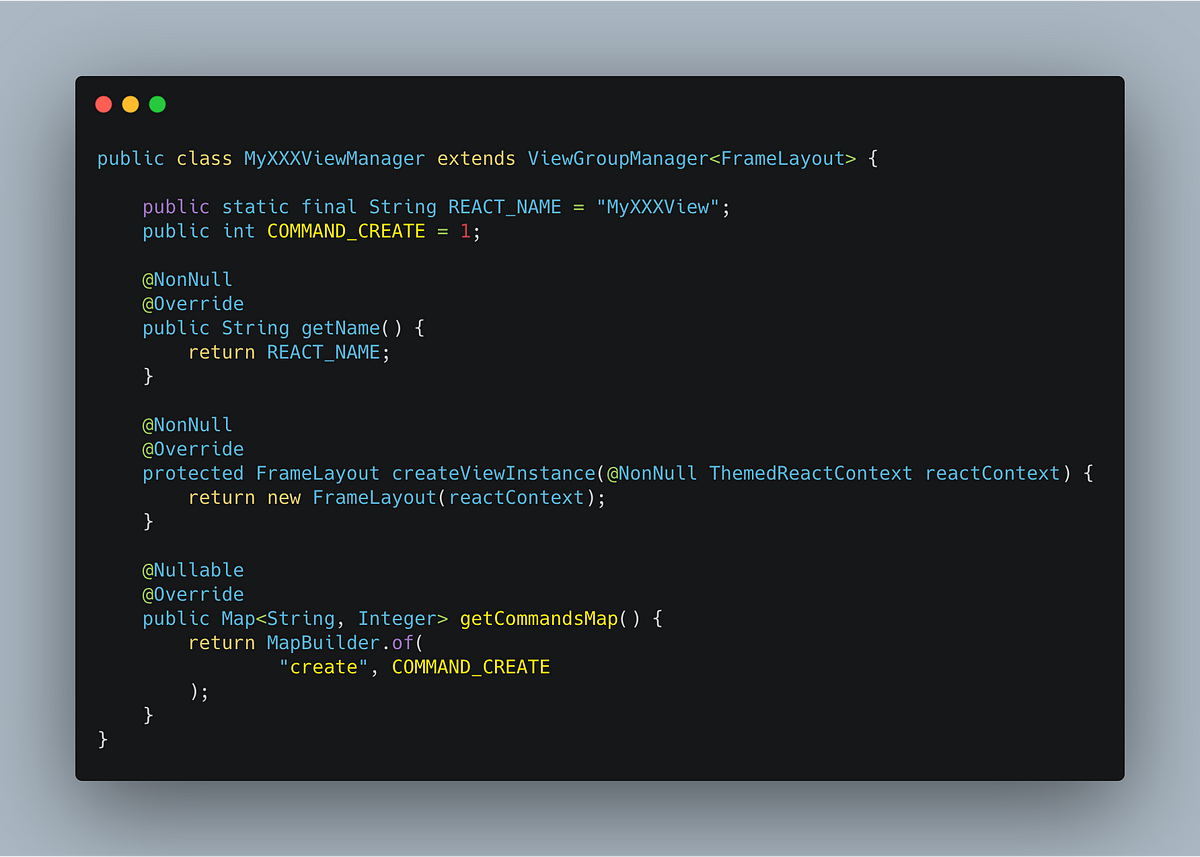
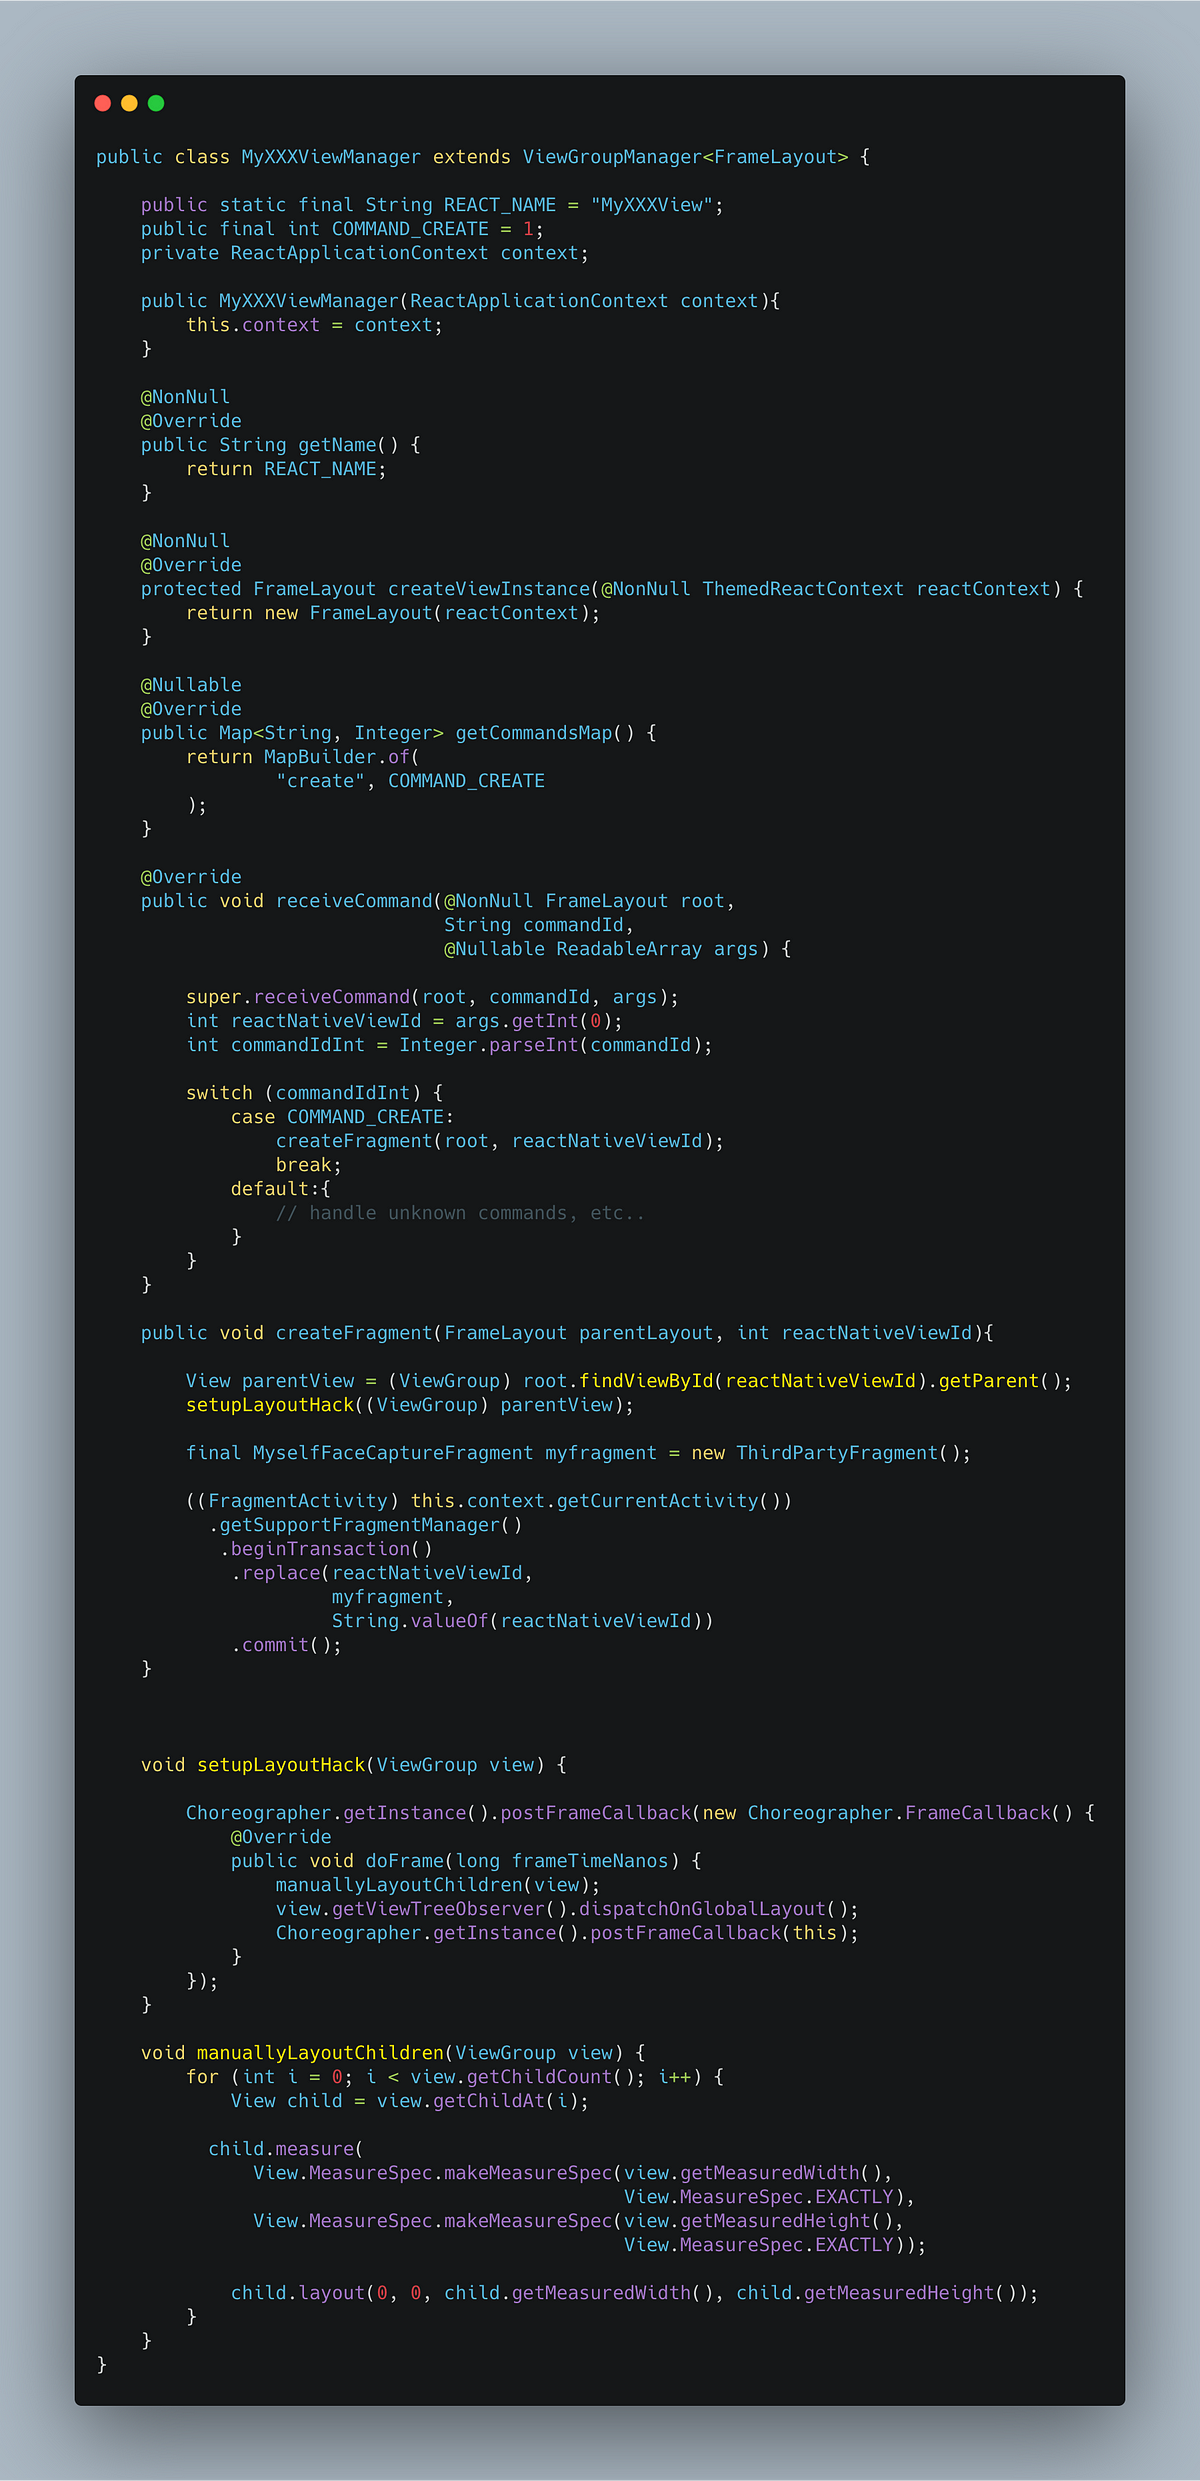
Supporting commands in Android
Looking at the dispatchViewManagerCommand function we realize we are still missing the command name. As you may wonder what it will be, the answer is simple: we will just override getCommandsMap method of MyXXXViewManager on Android Side and register the string "create" as a command (in fact we need to map our commands to Integers, but that's an only technical aspect):
Then, we can send the command from React Native like this (remember, UI manager knows about supported commands thanks to overriding getCommandsMap method):
But, if we would try to test the code from the previous steps, as you may guess, nothing will happen. We need some functionality for handling all commands on the Android side.
To handle all incoming commands from the React Native, we just need to override receiveCommand method and then add logic for committing the fragment with the Fragment Manager.
To commit the Fragment with supportFragmentManager, we need the reference to the context (we have added it by using constructor-injection when calling createViewManagers in MyXXXPackage class). If you would need any additional logic for your Native component, you can create another command following the principle above and then just implement the desired functionality.

Add measure layout method if needed
As we were rendering a camera preview in the fragment and nothing was being rendered, googling lead me to the following (thanks, Github). It just did not worked without this (if anyone knows why there is a bug, please let me know in the comments):
Sending Data to React Native from Native Component
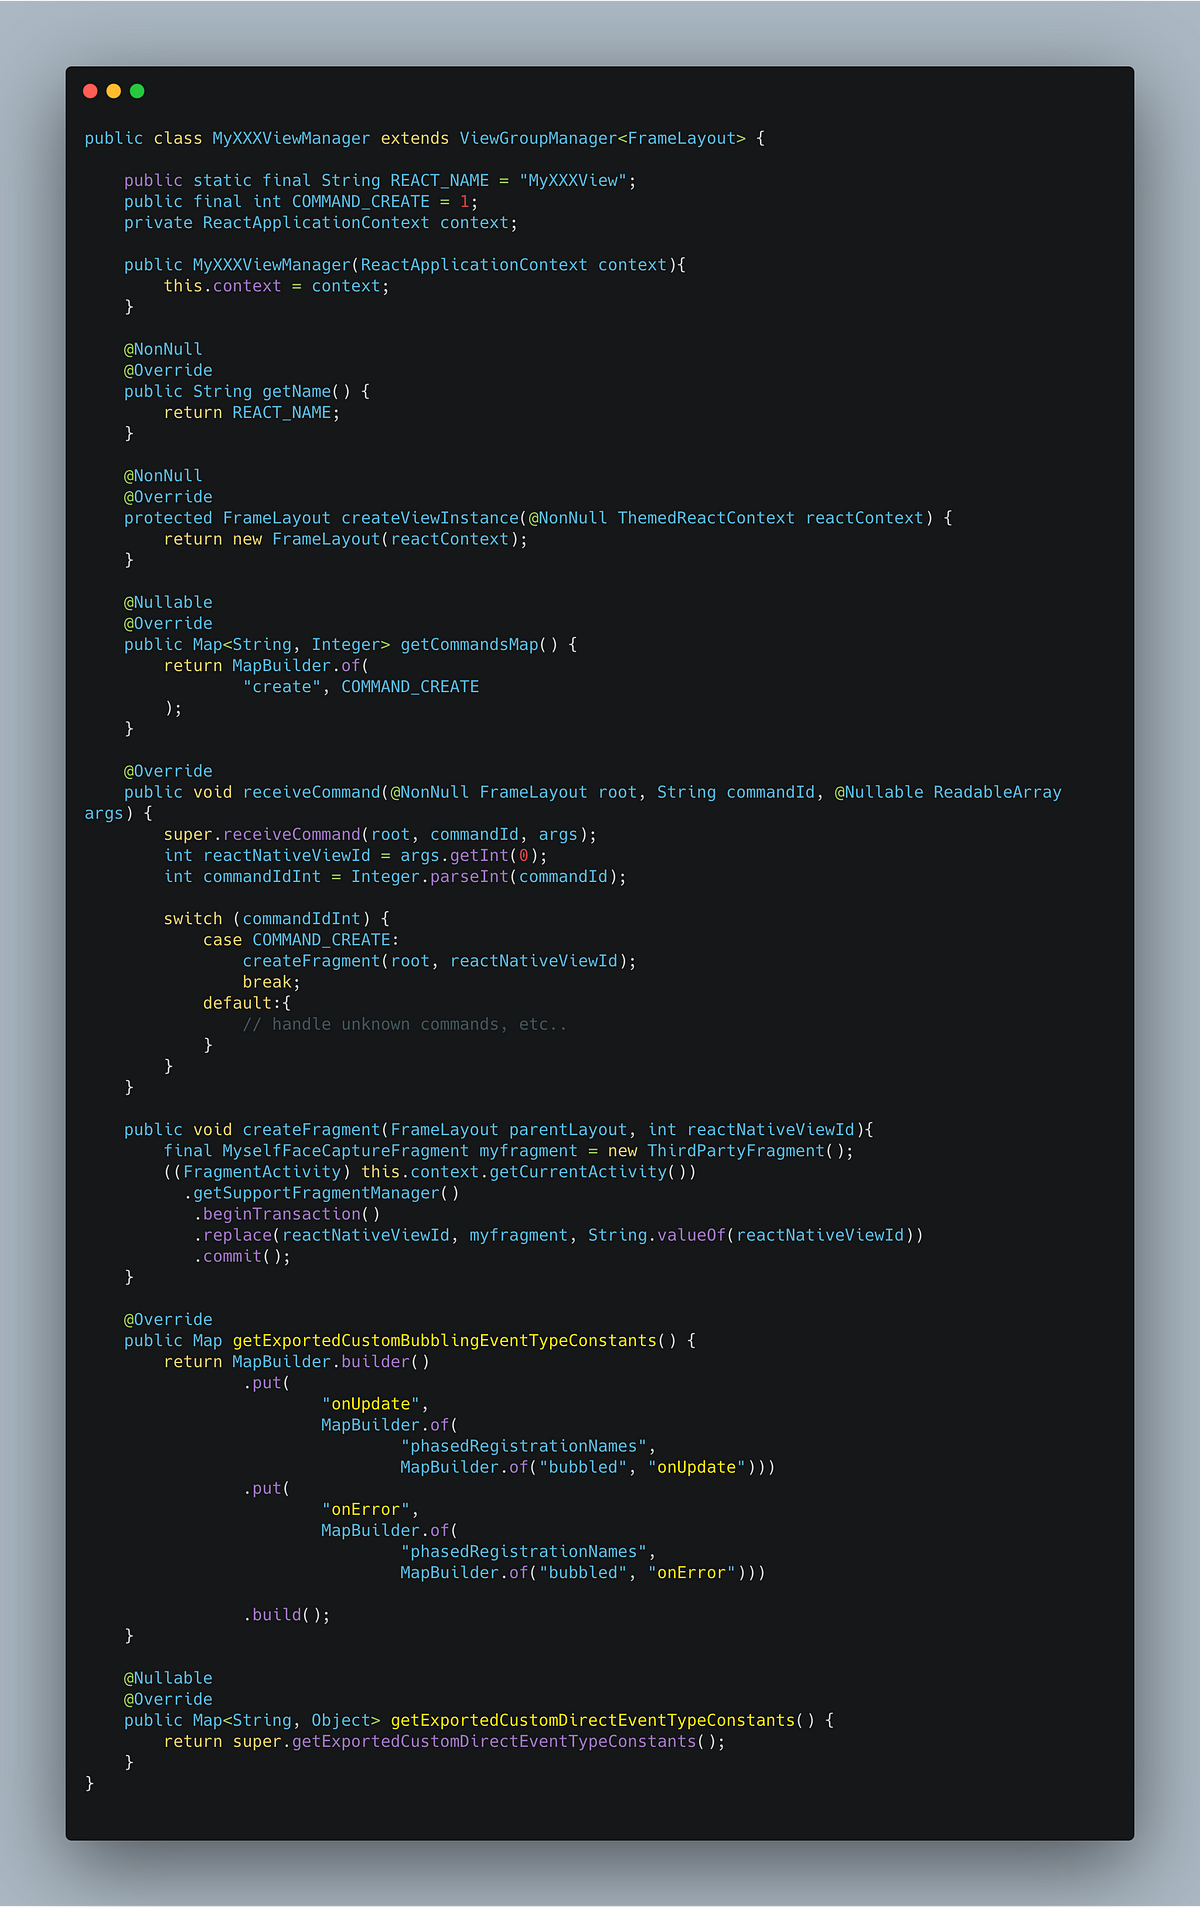
Now, when we are rendering our Fragment inside React Native, the next step would be sending the data from Android to the React Native (e.g. as we were integrating fragment containing face-detection, we needed to send the data to React Native when we detected the face). Unlike with Native Modules, we cannot use promises or callbacks to send data to the React Native, only event-emitting.
Event Types
For event emitting we can use 2 events types:
- DirectEvents available to RN bridge through getExportedCustomDirectEventTypeConstants method
- BubblingEvents available RN bridge through getExportedCustomBubblingEventTypeConstants method
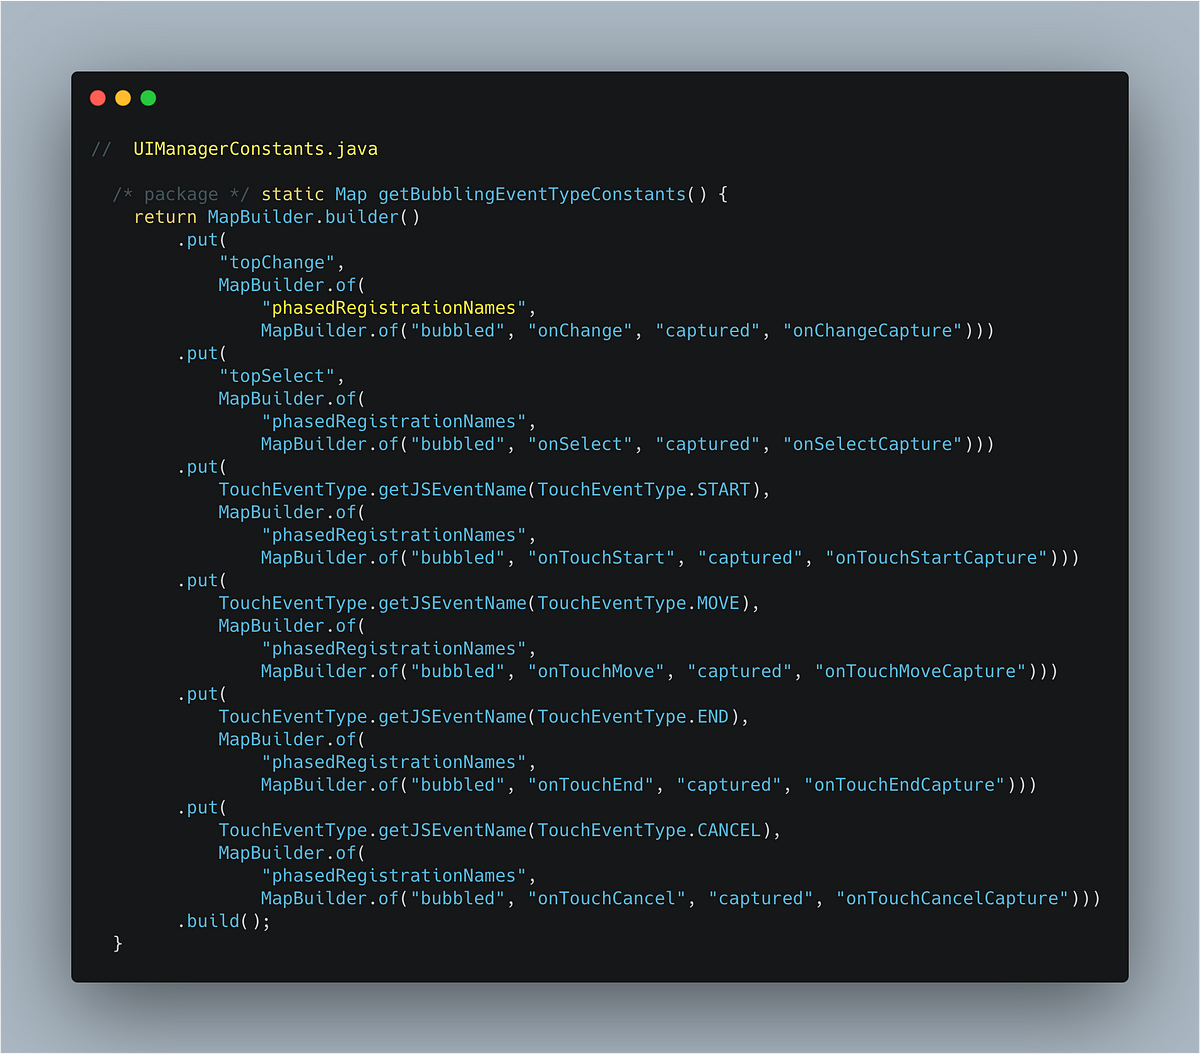
To register the events in the Android part, we will override the corresponding method for the event types we need:
If you wonder, what is "phasedRegistrationNames" string, we will respond with a code example from UIManagerConstants class:
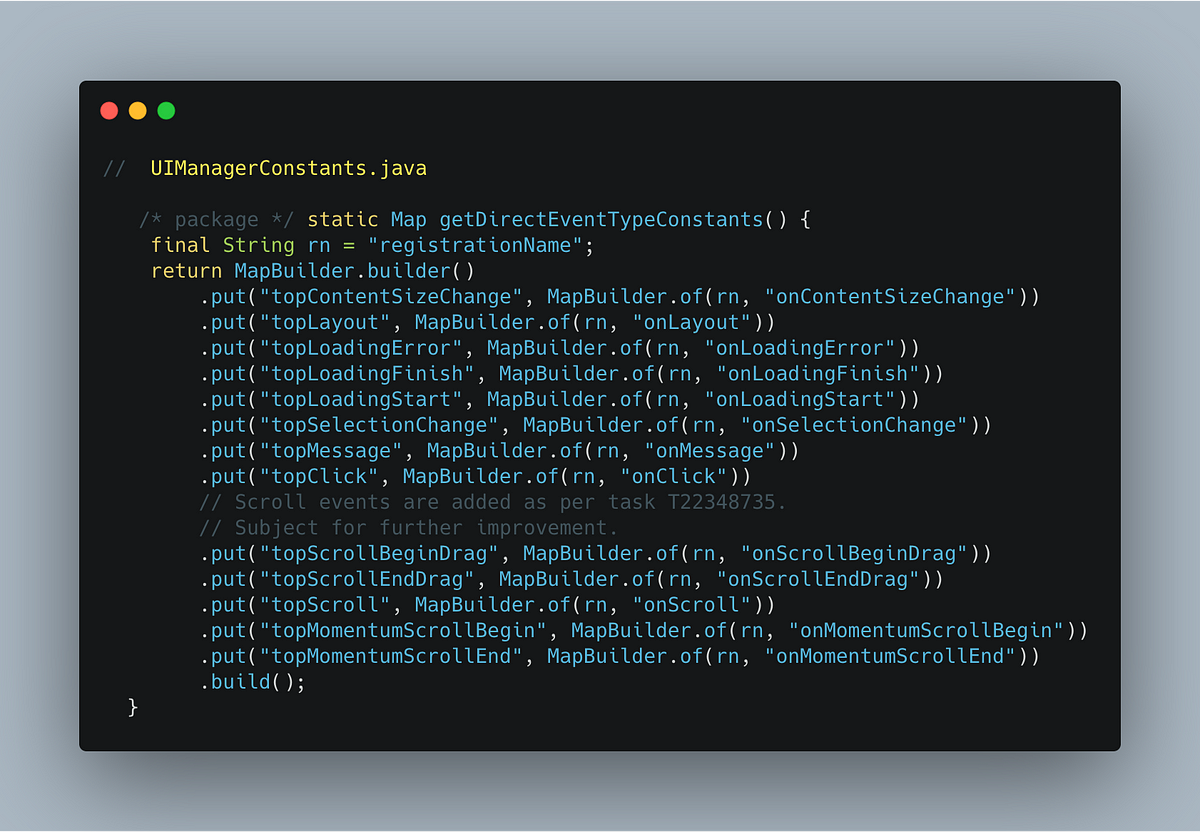
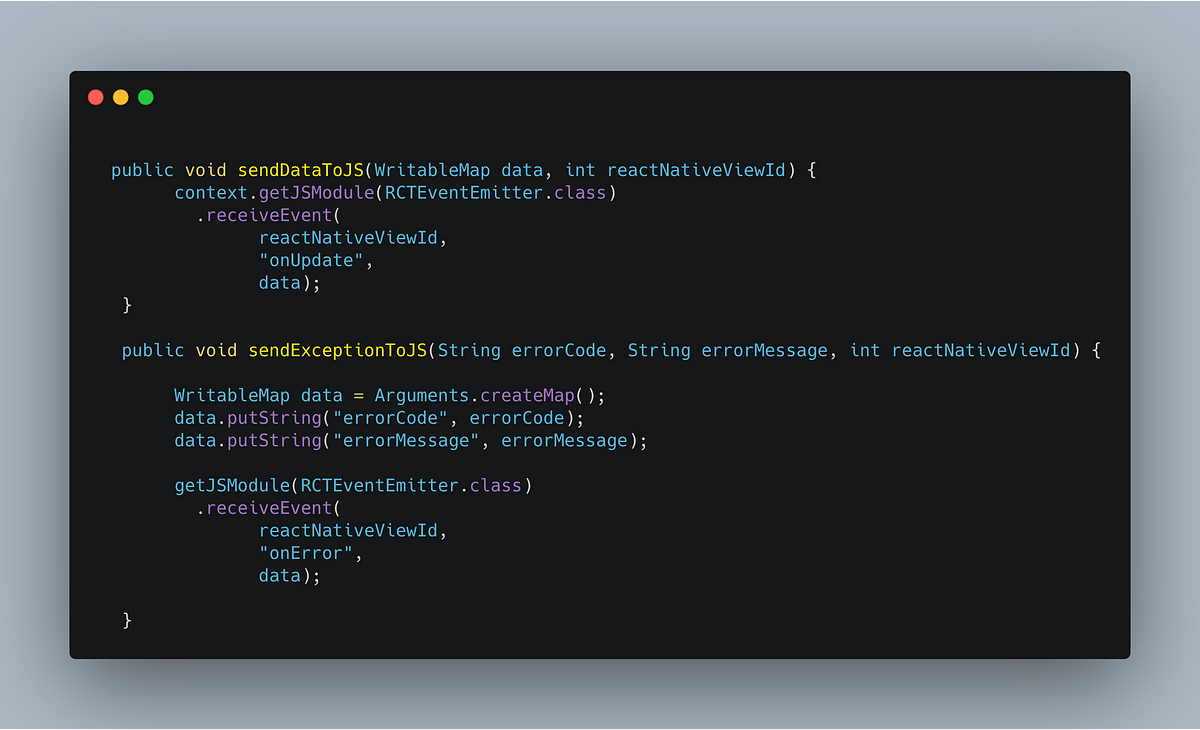
Sending data from Native Component To React Native
When we registered our events, now we finally can set up sending events to React Native using similar methods like the following (they could look similar to Promise reject/resolve API … in their own way) :
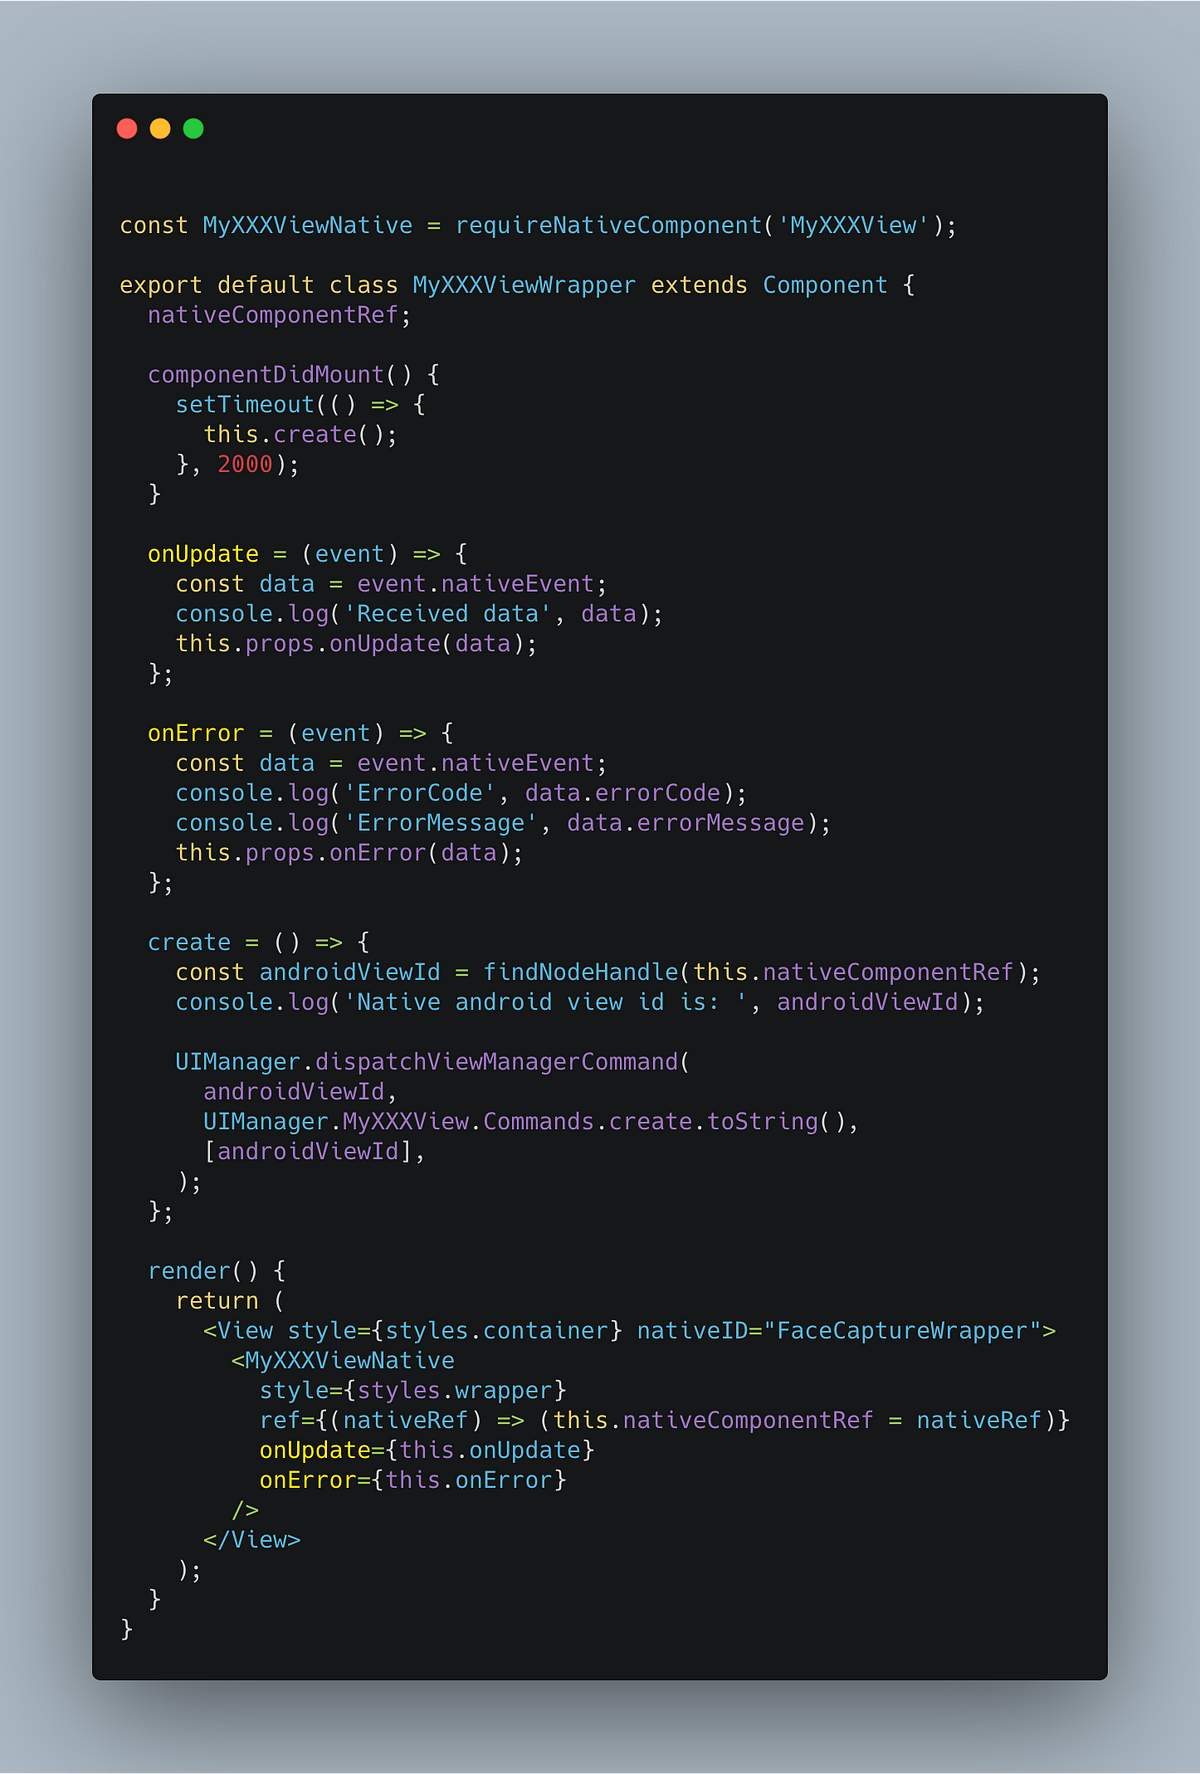
Handling data from Android in React Native
To receive emitted events from the Native Components / Android, we just need to add onUpdate and onError function and parse the data from the received event. Remember that naming (of the methods) is important and must be paired with registered event names.
We could integrate commands for proper handling unmounting events (freeing up the resources), but I think now you will be able to do it on your own.
Summary
In this article I have described the integration process of the Android Fragments into React Native. I hope now you know how to reuse Android Layouts, add Fragments, and use event-emitting to integrate almost any of the third-party libraries that were written only for Android.
If this article helped you, please, consider:
- donations via widget on the bottom-right so I can create more content like this
- sharing this article on Twitter, Linkedin or Facebook Groups. This is 100% free option and it will not take you anything, but just 3 seconds of your time - and yes, it would help more than donations.
Many thanks & Good Luck!